Using Classghost
 Class Ghost is a non invasive tool, in that no modification to the existing development environment or process is required. Getting productive with classghost is a simple process. Just add a command line argument to your Java application and you are done ! Classghost can now connect and inject classes to your application.
Adding the command line option to the JVM
Add this command line switch when you start the VM/Java Application.
-Xdebug -Xrunjdwp:transport=dt_socket,server=y,address=4994,suspend=n
This starts a jdb session within your VM, which classghost uses to interact with it.
One aspect to note here is the address=4994 This is the port on which class ghost has to connect. Make sure you specify the same port when you connect to the JVM from class ghost.

Guided Tour
Connecting
After starting your Java Application (stand-alone application, app server,web server etc.) Connect classghost to the VM running your application. For this, the hostname or i/p Address of the machine on which your application is running is required and the port on which the connection is to be made has to be specified. Remember this this the same port number used when specifying the command line arguments (address=xxxx). If you face connection problems , you should check if you are using the same port number as you gave in the command line parameter. See above section.
Virtual Machine Info
When connected to the remote machine, Class ghost should display the capabilities of the target JVM in the window next to the connection settings.
Suspend Remote VM
This option completely suspends the remote virtual machine. All threads on the target VM are frozen till they are explicitly
"resumed" or the connection to the target VM is lost.
View Loaded Classes 
This lists out all the classes loaded on the remote VM. Its probably a good idea to check out this list before trying to inject a class, as injection works for only loaded classes. If the class is not loaded in the remote VM, injection cannot succeed. It also gives you an idea what all classes are loaded in the VM at any given point in time. The screen displays the fully qualified class name, the class loader which loaded the class in to the VM, and the source file name for that class.The source file name may not be always retrieved as this is a platform dependent operation, which is not supported equally by all platforms. A filter option is provided to filter ut results, as the list of classes loaded in an app server or the like can be quite huge. To clear the filter just blank the field and hit filter again.
Inject Classes 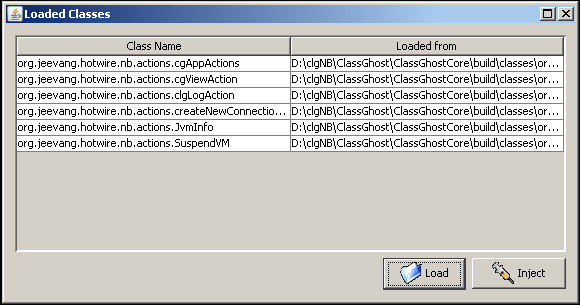
Here is where you pick your classes to be injected. Once you've identified the problem with the code, make the changes required and compile the file, compiling just that single file would be enough, no need to waste time with jars,ears and other deployment tasks. From this window, Click "Load" and choose the newly compile class files for your classes, you may choose any number of class files to inject in a batch. Once the class files are chosen, simply click "Inject". That's it ! your new code is injected to the live JVM. If injection failed for any of the classes you've chosen, the failed classes will remain in the window and will be marked red. See Why.
View Thread Info 
This window gives information about the live threads on the target virtual machine. You can extract the call stack from these threads. To do so, select the thread and freeze it. then click on the "ViewCallStack" button. The thread needs to be frozen as the call stack might change during extraction. Always remember to resume the thread after freezing it, otherwise the thread remains suspended. Class ghost will release all threads it has suspended, when it exists.